CGNAT Appliance Configuration
Configuration Hierarchy
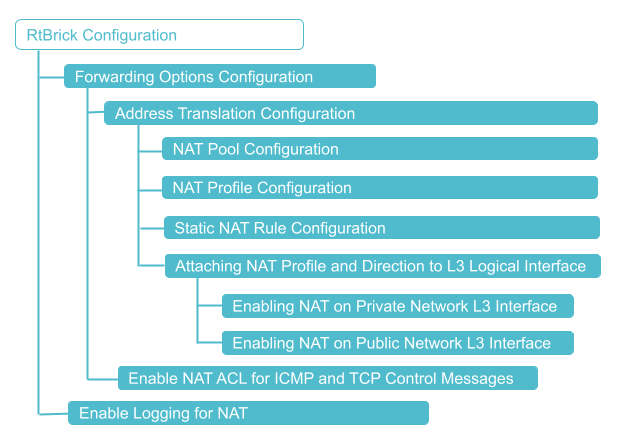
Prerequisites
Before configuring CGNAT, ensure that the appropriate platform profile is configured on the device. The platform profile determines the operating mode of the system and enables the required hardware resources for NAT functionality.
Configure one of the following platform profiles based on the deployment type:
-
Use
nat_1qornat_4qprofile when the system operates as a RBFS CGNAT, where NAT is integrated with subscriber management. -
Use this
nat_standaloneprofile when the system operates as a dedicated CGNAT appliance without BNG subscriber functionality.
The platform profile must be configured and the system must be rebooted before proceeding with the CGNAT configuration.
Reboot the system for the changes to take effect, after setting the platform profile. For information about Platform Profile configuration, see Platform Profile.
CGNAT Appliance Configuration
You must perform the following tasks to configure CGNAT appliance.
-
Configure NAT Pool
-
Configure NAT Profile
-
Enable NAT on an Instance
-
Attaching NAT Profile and Direction to L3 Logical Interface
-
Enable NAT on Private Network L3 Interface
-
Enable NAT on Public Network L3 Interface
-
Configure NAT Rule
-
Enable Logging for NAT
Configuration Syntax and Commands
The following sections describe the CGNAT appliance configuration syntax and commands.
NAT Pool Configuration
A NAT IP address pool includes a set of public IPv4 addresses that are used for network address translation. You can create multiple public IPv4 address pools and one pool includes a range of public IPv4 addresses. These pools allocate public IPv4 addresses to subscribers during address translation. While configuring a pool, you can define the group of public IPv4 addresses belonging to that pool by specifying the lowest and highest IP addresses.
The system allows you to create multiple pools and define the association among them. You can define the 'next-pool-name' that takes over when the current pool gets exhausted with the IPv4 addresses. When one pool gets exhausted, the next pool takes over and starts serving the IP addresses to subscribers when the address translation occurs.
| Static and dynamic IP pools cannot be configured simultaneously; they are mutually exclusive. |
Syntax:
| Attribute | Description |
|---|---|
|
Specify the name of the address pool. |
|
Specify both the highest and lowest IPv4 addresses in the range of IPv4 addresses for the pool. |
|
Specify the highest IPv4 address in the address pool. You must specify the highest IP address in the range of IP addresses. |
|
Specify the lowest IPv4 address in the address pool. You must specify the lowest IP address in the range of IP addresses. |
|
Specify the name of the next address pool that is to be used when the current address pool is allocated completely. |
Example Configuration:
The following commands configure nataddr_pool1 as the NAT pool and nataddr_pool2 as the next pool.
It indicates NAT pool nataddr_pool1 contains a range of public IPv4 addresses from 100.100.100.1 to 100.100.100.5.
When the pool nataddr_pool1 has fully allocated its IPv4 addresses, the next pool named nataddr_pool2 will start allocating IPv4 addresses from its pool. The pool nataddr_pool2 includes a rage of IPv4 address from 100.100.101.1 to 100.100.101.150.
set forwarding-options address-translation pool nataddr_pool1
set forwarding-options address-translation pool nataddr_pool1 next-pool-name nataddr_pool2
set forwarding-options address-translation pool nataddr_pool1 ipv4-address low 100.100.100.1
set forwarding-options address-translation pool nataddr_pool1 ipv4-address high 100.100.100.5
set forwarding-options address-translation pool nataddr_pool2 ipv4-address low 100.100.101.1
set forwarding-options address-translation pool nataddr_pool2 ipv4-address high 100.100.101.150
Example Configuration:
supervisor@rtbrick: cfg> show config forwarding-options address-translation pool
{
  "rtbrick-config:pool": [
    {
      "pool-name": "nataddr_pool1",
      "next-pool-name": "nataddr_pool2",
      "ipv4-address": {
        "low": "100.100.100.1",
        "high": "100.100.100.5"
      }
    },
    {
      "pool-name": "nataddr_pool2",
      "ipv4-address": {
        "low": "100.100.101.1",
        "high": "100.100.101.150"
      }
    }
  ]
}
Configuring NAT Profile
A NAT profile defines how the NAT device has to perform the IPv4 address translation. NAT profile allows you to define an instance, IPv4 address pools, maximum number of translations, and mapping a particular internal IPv4 address with a particular external IPv4 address for a deterministic address translation.
A single NAT profile can be attached to subscribers across different instances. This means that regardless of which instance a subscriber belongs to, they can share the same NAT profile. For example, subscribers in different routing instances can be managed using the same NAT settings.
Subscribers within the same instance can be assigned different NAT profiles. Different groups of subscribers or services within the same instance can have tailored NAT configurations.
| The configuration limit of NAT rules per subscriber in NAT profile is 16,384. |
Syntax:
| Attribute | Description |
|---|---|
|
Specify the NAT profile name. |
|
Specify deterministic as true to enable deterministic NAT for the profile. Deterministic NAT allows subscribers always to connect with a single public IP. |
|
Specify the protocol: tcp, udp, or other. |
|
Specify the ageing time value for the protocol. Default, 300 seconds for TCP and UDP. The allowed Ageing Time Out range values are as follows:
|
|
Specify the TCP/UDP control plane ageing timeout value. Allowed range: 5 - 120 seconds. * Default, 10 seconds for TCP traffic. |
|
Specify the maximum number of rules per subscriber or an interface. The supported values for maximum address translation for an interface are 64, 128, 256, 512, 1024, 2048, 4096, 8192, and 16384. |
|
Specify the name of the public IP address pool. |
The following commands configure the NAT profile named nat_profile1. The nat profile nat_profile1 is configured on the instanced vrf1 with a pool attached nataddr_pool1. Maximum rules are configured as 128 rules and the aging period is configured as 600 seconds for TCP traffic, 300 seconds for UDP traffic, and 300 for 'other' traffic.
set forwarding-options address-translation profile nat_profile1
set forwarding-options address-translation profile nat_profile1 instance vrf1
set forwarding-options address-translation profile nat_profile1 pool nataddr_pool1
set forwarding-options address-translation profile nat_profile1 ip-protocol tcp ageing-timeout 600
set forwarding-options address-translation profile nat_profile1 ip-protocol udp ageing-timeout 300
set forwarding-options address-translation profile nat_profile1 ip-protocol other ageing-timeout 300
Example Configuration:
supervisor@rtbrick.net: cfg> show config forwarding-options address-translation profile
{
  "rtbrick-config:profile": [
    {
      "profile": "nat_profile1",
      "instance": "vrf1",
      "pool": "nataddr_pool1",
      "ip-protocol": {
        "tcp": {
          "ageing-timeout": 600
        },
        "udp": {
          "ageing-timeout": 300
        },
        "other": {
          "ageing-timeout": 300
        }
      }
    }
  ]
}
Enable NAT on an Instance
You can enable address translation for a specific routing instance such as VRF or virtual router rather than globally across the entire router.
Syntax:
| Attribute | Description |
|---|---|
|
Name of the instance. |
The following command is used to enable address translation for the instance named 'vrf1'.
set instance vrf1 address-translation true
supervisor@rtbrick.net: op> show config instance vrf1 address-translation
{
  "rtbrick-config:address-translation": "true"
}
Attaching NAT Profile and Direction to L3 Logical Interface
Enabling NAT on a Private Network L3 Interface
To enable NAT on a private network L3 interface, you need to configure the direction of the network interface as the "local".
Syntax:
| Attribute | Description |
|---|---|
|
Name of the interface. Example: ifp-0/0/1. |
|
Create a logical interface (also referred to as a sub-interface) under the physical interface. |
|
Specify the NAT profile name. |
|
Indicates the NAT configuration on a private network. |
The following command attaches the NAT profile nat_profile in the local direction to an L3 logical interface.
supervisor@rtbrick>multiservice-edge1.rtbrick.net: cfg> show config set interface ifp-0/0/1
set interface ifp-0/0/1
set interface ifp-0/0/1 unit 100
set interface ifp-0/0/1 unit 100 address-translation
set interface ifp-0/0/1 unit 100 address-translation direction local
set interface ifp-0/0/1 unit 100 address-translation profile nat_profile
Example Configuration:
supervisor@rtbrick>multiservice-edge1.rtbrick.net: cfg> show config  interface ifp-0/0/1
{
  "rtbrick-config:interface": [
    {
      "name": "ifp-0/0/1",
      "unit": [
        {
          "unit-id": 100,
          "address-translation": {
            "direction": "local",
            "profile": "nat_profile"
          }
        }
      ]
    }
  ]
}
Enabling NAT on a Public Network L3 Interface
To enable NAT on a public network L3 interface, you need to configure the direction of the network interface as the "public".
Syntax:
| Attribute | Description |
|---|---|
|
Name of the interface. |
|
Configure the number of sub-interfaces under the physical interface. |
|
Specify 'public' for the external interface. |
The following commands configure the external interface ifp-0/1/64 for IPv4 address translation. 'Unit' logical identifier for this physical interface. Direction 'public' shows the configuration on external interface for address translation.
set interface ifp-0/1/64 unit 100
set interface ifp-0/1/64 unit 100 address-translation
set interface ifp-0/1/64 unit 100 address-translation direction public
supervisor@rtbrick.net: cfg> show config interface ifp-0/1/64 unit 100
{
  "rtbrick-config:unit": [
    {
      "unit-id": 100,
      "address-translation": {
        "direction": "public"
      }
    }
  ]
}
NAT Rule Configuration
You can define NAT rules only for static NAT. A NAT rule defines a match condition and a corresponding action. After you specify NAT rules, each packet is matched with each NAT rule. If a packet matches the condition specified in a rule, then the action corresponding to that match occurs. Match rules govern how the translation of private IPv4 addresses to public IPv4 addresses is performed.
With NAT rules, you can define how address translation is applied to traffic, and how to handle various protocols and data traffic, such as TCP and UDP, to ensure proper address translation and the mappings of private addresses to public addresses.
Rules also define how to handle inbound and outbound traffic, different protocols, and data traffic such as TCP and UDP for ensuring the proper address translation of traffic.
| A maximum of 16,384 NAT rules on NAT profile is allowed. |
Syntax:
| Attribute | Description |
|---|---|
|
Specify the name of the rule. |
|
Specify the ordinal value. An ordinal value is a numerical representation that indicates its relative position or order. |
|
Specify the RBFS instance name. |
|
Specify the IP protocol, TCP or UDP. |
|
Specify the private IPv4 address or port number that needs to be translated. |
|
Specify the public IPv4 address. This public IP will be mapped with the private IP in the translation table. |
Enable Logging for NAT
You can optionally enable logging for CGNAT appliance operations.
| All RBFS logs and related information is available in the RBFS Logging User Guide. For the list of RBFS logs, see Log Reference. |
| Attribute | Description |
|---|---|
|
Specify the log level. |
|
Specify the log module. |
|
Specify the plugin-alias URL. Plugin-alias is an external logging host server to which you can export logs. For example, Graylog. |
The following commands configure logging for NAT module natd with a log level 'debug'.
set log bd natd
set log bd natd module nat
set log bd natd module nat level debug
supervisor@rtbrick.net: cfg> show config log bd natd
{
  "rtbrick-config:bd": [
    {
      "bd-name": "natd",
      "module": [
        {
          "module-name": "nat",
          "level": "debug"
        }
      ]
    }
  ]
}
Modifying the Policer on NAT Trap
You can modify a 'policer' associated with NAT traps, which directs certain packets to the control plane (hostpath). A NAT trap indicates when a device is performing network address translation, some packets that require special handling, are diverted to the control plane for processing.
To change the policer for NAT traps, use the following command:
Syntax:
| Attribute | Description |
|---|---|
|
Specify the name of the policer. |
Example for modifying the policer for NAT trap.
set forwarding-options address-translation trap policer _DEFAULT_POLICER_5_MB
Selective NAT Bypass Using Destination Prefix
RBFS CGNAT allows selective bypass of Network Address Translation based on destination IPv4 prefixes using an L3 ACL rule. Traffic matching the configured prefix in the specified direction is excluded from address translation. This feature enables you to preserve original source and destination addresses for specific networks.
Syntax
The following configuration defines a rule named 'exclude_nat' with an ingress match condition. The rule matches traffic destined to the 10.10.10.1/24 prefix and assigns it a priority of 500 for processing order. Matching packets are trapped to the default control-plane handler, allowing the system to process them separately for excluding them from NAT handling.
set forwarding-options acl l3v4 rule exclude_nat
set forwarding-options acl l3v4 rule exclude_nat ordinal 1
set forwarding-options acl l3v4 rule exclude_nat ordinal 1 match destination-ipv4-prefix 10.10.10.1/24
set forwarding-options acl l3v4 rule exclude_nat ordinal 1 match direction ingress
set forwarding-options acl l3v4 rule exclude_nat ordinal 1 action trap default
set forwarding-options acl l3v4 rule exclude_nat ordinal 1 priority 500
{
  "rtbrick-config:acl": {
    "l3v4": {
      "rule": [
        {
          "rule-name": "exclude_nat",
          "ordinal": [
            {
              "ordinal-value": 1,
              "match": {
                "destination-ipv4-prefix": "10.10.10.1/24",
                "direction": "ingress"
              },
              "action": {
                "trap": "default"
              },
              "priority": 500
            }
          ]
        }
      ]
    }
  }
}